
SU hosts an open-source online homework system WeBWorK. It is not associated with any textbook publisher, however, there are many open-source problems available.
General information about WeBWorK
- WeBWorK is free to use
- WeBWorK is not affiliated with any publisher. Instructors can compose their homework sets by taking problems from Open Problem Library, or by writing their own. For MAT 121, 122, 183, 221, 222, 284, 285, 286, 331, 414, 485, 521 we already have homework sets from previous semesters.
- The number of attempts is unlimited by default, but can be changed (for True/False questions, for example).
Please see below for explanation of common tasks involved in using WeBWorK. The first three are necessary to make your section usable for the students.
Edit open/due/answers dates for homework sets
Click “Hmwk Sets Editor” in the sidebar on the left, and choose “Edit all sets”. This opens a page where all assignments are listed with
their Open, Due, And Answer Dates.
- Open = students can see the set and work on it at this time.
- Due = the students’ work will no longer be accepted for credit after this time.
- Answer = the answers become available to view.
The above dates apply to the entire “WeBWorK course”. To override them for a group of users (such as a section), proceed as follows.
- Go to Instructor Tools.
- Filter users (for example, by selecting a section and click Change Display Settings).
- Select all users shown after filtering.
- Select a homework set.
- Click “Edit one set for users” (near the bottom).
- Enter new dates for your section which will override the course-wide dates. Check the checkboxes next to modified dates.
- Click Save Changes.
Import classroster into WeBWorK
- Download Blackboard Gradebook and open it with Excel. (Note: in Ultra Course View you will first need to create some gradebook item, which can be hidden from students.) The first four columns A,B,C,D will be Last Name, First Name, UserName, Student ID.
- Add a column with the function
=CONCATENATE(D2,",",A2,",",B2,",C,,,,",C2,"@syr.edu,",C2)
(second row entry shown) - Using WebWork file manager, create a file roster.lst and paste the contents of the new column into it.
- Use the Import Users command under Classlist editor.
This adds students to WeBWork roster, and sets up their login name as NetId and their initial password as 9-digit SUID number. Students can change their password after logging in.
This process can be repeated as new students enroll during the first week of semester. Alternatively, one can add students manually as described below.
Explanation of the Excel formula shown above: the WeBWorK input format is a comma-separated file with fields student_id,last_name,first_name,status,comment,section,recitation,email_address,user_id.
Of these, status is set to “C” (meaning currently enrolled), while comment, section, and recitation are left empty.
If you teach multiple sections of the same course, it is best to have one WeBWorK section to manage. In order to be able to sort the students by section/recitation later, you may want to add columns for section and/or recitation (say, E and F), and use the formula =CONCATENATE(D2,",",A2,",",B2,",C,,",E2,",",F2,",",C2,"@syr.edu,",C2)
Assign homework sets to students
Click “Instructor Tools” in the left sidebar; this opens the main dashboard with users and sets. Select all users in the list of users. Select all (desired) sets in the list of sets. Click “Assign” [selected users to selected sets].
With very large classes (over 250 students) this may fail. In this case you should be able to assign homework to parts of the class at a time. For example, select the students with names beginning with A-K and assign homework to them, then do the same for L-Z.
Add students to your course
If some students added your class after the roster was imported, you have two ways of adding them. The first option is to repeat the two steps described above: import classroster and assign homework. They do not affect existing students in the WeBWorK course. The second option is to add one or several students manually:
- Go to “Classlist Editor”, and select “Add” and enter the number of students to add.
- For each student, enter Last Name, First Name, Student ID = SUID number, Login Name = NetId (the part of email before @syr.edu), and Email. The fields Section, Recitation, Comment can be left blank unless you are using them.
- Select homework sets which will be assigned to these students (normally, all of them).
- Click “Add Students”
Add a TA to your course
- Go to “Classlist Editor”, and select “Add [1] student(s)”
- Enter their information. Whatever you enter as “Student ID” will be used as their initial password. For Login Name, it is convenient to use NetId. The fields Section, Recitation, Comment can be left blank.
- After the TA appears on the class list, click the pencil icon next to their name to open Classlist Editor.
- Change the permission level from “student” to “ta”
Configure course options
Most of the options under “Course configuration” can be left as they are. You may consider changing the following ones:
| Option | Description |
| Permissions – Can e-mail instructor | The default is “student”, meaning that students can use WeBWorK interface to send email. Changing this to “nobody” will disable the feature. |
| PG – Assist with the student answer entry process | The default is “none” meaning that students enter formulas as plain text, e.g., 2/(x+3). Choosing “MathQuill” will enable two-dimensional display of formulas, so that 2 will be shown above x+3 and the parentheses will no longer be necessary. |
| PG – Use log base 10 instead of base e | By default log() means logarithm base e. If your course is based on a textbook where log() means logarithm base 10 (e.g. MAT 284, 285, 286) then this option should be changed. |
| If you do allow email to be sent from within WeBWorK, you can choose here who will receive it. By default, email goes to users with “professor” role. Changing it to “ta” will also send it to all TAs but then it is impossible to track which emails were answered. A possible solution is to enable “Feedback by section”, which will direct student emails to the users based on section information in WeBWorK roster. Alternatively, one can set this to “nobody” but enter a shared mailbox (e.g. Gmail) under “Additional addresses for receiving feedback e-mail. “ | |
| Optional Modules – Enable Reduced Scoring | Disabled by default. If enabled, this reduces the points earned by students during the specified period before the due date. One can use this feature to give bonus points for finishing homework well before the due date: e.g., if reduced scoring period earns 80%, then multiply the homework total by 5/4 so that reduced scoring period counts normally but the work done before it earns 25% bonus. See below for details. |
Limit the number of attempts
By default, students have unlimited attempts on WeBWorK. To change this for a particular problem, go to Homework Sets Editor, select the homework, and enter a number in “Max attempts” in the column Data.
To change the default, for example, to 5 attempts, do the following using the File Manager (note: this requires admin privilege)
- Click the up carat on the left side of “templates”.
- Select the file course.conf and then the edit button.
- At the bottom of the file insert:
$problemDefaults{max_attempts} = 5;
Note the ending semicolon. - Save the file
The change applies to problem sets created after this change, not before.
Export grades and upload to Blackboard
Go to “Scoring Tools”, uncheck “Pad Fields”, select the homework sets to score, and click “score selected sets”. Then download the file (.csv) and open it in Excel.
To import grades into Blackboard, delete unnecessary columns and rows of the file until it has the following form:
| Username | Homework 1 | Homework 2 |
| jqpublic | 7.5 | 8.0 |
(The Username column is called “Id” in WeBWorK, but it needs to be renamed Username for Blackboard to recognize it.) Save the file, still in the .csv format. In Blackboard, go to Work Offline -> Upload, and upload the file. Any users who do not exist on Blackboard (“admin”, TAs, etc) will be ignored. The scores will be initially imported as text, but this can be changed in Blackboard by using “Edit Column Information”: select “score” as Primary Display, and enter Points Possible.
Give an extension to some student
Go to “Instructor Tools”, select the student’s name in the list, click “View/Edit” [all sets for one user(set dates, scores)]. This opens the page where the new “Due” and “Answers” dates can be entered for that student. Mark the changes by selecting the appropriate checkboxes. Click Submit at the bottom.
Reduced credit period
This is an option to offer extensions with (possibly) reduced credit automatically. It is turned off by default. To set it up, go to “Course Configurations” -> “Problem Display/Answer Checking” and set the Length of Reduced Credit Period (in minutes) and Value of work done in Reduced Credit Period (for example, 0.75 is 75% credit).
You will also need to enable it for each assignment by going to “Hmwk Sets Editor” -> “edit all sets”, and checking all boxes that say “Enable Reduced Credit”.
Note that Reduced Credit Period begins the set amount of minutes before the Due Date. No credit is given after the Due Date.
Remove a problem from a homework set, or reorder problems
- Go to “Hmwk Sets Editor”. This will display a table with existing homework sets
- In the column “Edit Problems” displays the number of problems in a set. Click this number.
- Check “Delete It?” next to the problem(s) you wish to remove from the set.
- At the bottom, check “Force problems to be numbered consecutively from one” and click “Save Changes”.
Changes do not affect other WeBWorK sections. The removed problems remain available in the database and can be added again to the same or different set.
The problems can also be reordered by dragging them up or down.
Important: make sure that after your edits the problems are numbered consecutively from 1. This can be done either by clicking the button “Renumber problems” or by checking the box “Force problems to be numbered consecutively from one”. After doing either, you should Save Changes.
In particular, quiz-type assignments will malfunction if the problems are not numbered consecutively from 1.
Change a student’s score
- Open Instructor Tools
- Select a student and a homework set
- Click “Edit one set for users”
- The student’s score on each problem will be shown as “Status”, which you can change (for example, from 0 to 1)
- Click Save Changes at the bottom
Change a student’s status in the course
The normal status is “Enrolled”. If a student drops out of your class, you may want to change their status to “Drop”, especially if there is a possibility that the student switched to someone else’s section. The status change preserves the grade data but prevents the student from logging in (and thus doing homework in a wrong section). It also excludes the student from the tables generated by Scoring Tools.
To change the status, select the student(s) in the Classlist Editor and choose “edit selected users”. Use a dropdown to select Drop instead of Enrolled. Then save changes.
Create a homework set from library problems
- Click Library Browser.
- Select a target set or create a new one.
- Pick Subject, Chapter, and Section, and click View Problems.
- For some subjects (like calculus) the number of problems can be very large. Advanced Search allows you to limit the results to a particular textbook in this case.
- Click Add to add a problem to the target set.
- After you are done, go to Hmwk Sets Editor to schedule the set
Copy problem sets from one course/section to another
Go to Hmwk Sets Editor (under “Instructor Tools”), then to Export tab. Select the sets to be exported (or just export all). This process creates a .def file for each problem set.
The .def files need to be downloaded with File Manager, so they can be uploaded to another section. It is more convenient to make a single archive of .def files (“Make Archive” in File Manager) and download the archive.
Upload the archive created at step 2 to the target section. It’s unpacked automatically, creating a bunch of .def files.
The .def files are imported using Hmwk Sets Editor, Import tab.
Now the homework sets will appear under Homework Sets, with the same begin/end dates as they had in the first section.
It’s important to note that .def files do not contain the problems themselves, only links/references to them. If the references are to the Open Problem Library, they are all that’s needed. But if the sets use locally stored files, those files will need to be copied over too, following the same archive – download – upload process. The problem files have .pg extension.
To have a complete archive of your homework, export homework sets as mentioned above, then use the File Manager to select all .def files and folders with .pg files, and click Make Archive. Download this archive (extension .tgz) and keep in a safe place.
Troubleshooting
| Problem | Solution |
|---|---|
| A student cannot log in. | Check if the student is present in WeBWorK roster (shown by “Classlist Editor”). If the student is not there, they need to be added in order to be able to log in: this process is described above. If the student’s name is on the roster, try to login to WeBWorK using their credentials (NetId and SUID), for example in a private window of your browser. Often you will find that the login works, which means the student made a mistake entering it. Make sure they are entering their login name as it was set up by you (normally, in lowercase). Both login and password fields are case sensitive. If the student set their own password and forgot it, you can give a new password using Classlist Editor -> Password. |
| “Request-URI Too Long” error appears when assigning homework problems to the class using Instructor Tools. | This happens with very large classes, when concatenating the usernames of all the students results in a longer string than the web server supports. Solution: assign homework to parts of the class at a time. For example first select the students with names beginning with A-K and assign homework to them, then do the same for L-Z. About 250 students at a time will work. |
Questions about WeBWorK can be addressed to Leonid Kovalev.
Creating WeBWorK assignments
You can using existing problems from the Open Problem Library (OPL), modify OPL problems, or write your own from scratch. All these are explained below.
Picking problems from the OPL
- Click Library Browser. Use either Create a New Set or add problems to an existing one (by selecting Target Set from the dropdown).
- Select Subject, Chapter, and Section. The option “Max Shown” can be set to “All” to display all available problems for that section.
- Click View Problems
- Click Add for each problem you wish to be added. There is no “Remove”; if you change your mind about adding a problem, it will need to be removed later.
- To reorder problems or remove some of them, click Edit Target Set which brings you to homework set editor. Another way to open this editor is to click Hmwk Sets Editor in the menu, find the set you wish to edit, and click the number in the column “Edit Problems”.
Modifying OPL problems
You may want to adjust the notation or terminology in a problem, add a hint, etc. This can be done by creating a local copy using Problem Editor.
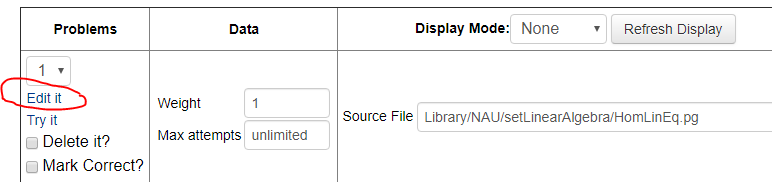
There are two ways to open Problem Editor. One is from Homework Sets Editor, by clicking “Edit it” under a problem.
The other is from the set preview:
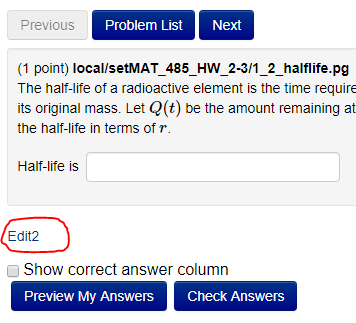
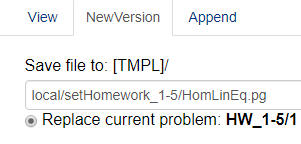
To edit a problem, you need to create a new version of it, which will be stored locally. Click NewVersion:

The location offered by default is not optimal: problems end up being disorganised. I use a path of the form local/setHomework_1-5/filename.pg where Homework_1-5 is the name of homework set. This naming convention is not necessary, but it is consistent with what WeBWorK editor suggests when creating a new problem.
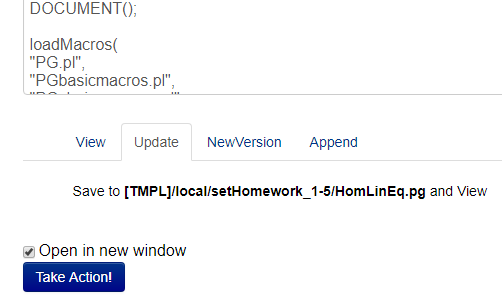
After making your edits, choose Update tab and Take Action, which both saves the file and displays the new version in another tab, so you can check that it works.
Creating problems from scratch
The Homework Set Editor, which is used for reordering or deleting problems from a set, can also be used to add them. Check “Add N blank problem template(s)” and Save Changes:
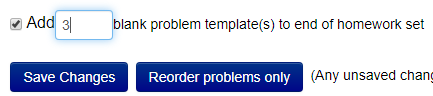
Then Edit it to bring up a Problem Editor with pre-filled template of a WeBWorK problem (something about the value of pi). The structure that it shows is useful but the following example may be closer to reality.
DOCUMENT();

loadMacros("PGstandard.pl", "MathObjects.pl");

TEXT(beginproblem());

###### Context, variables, flags

Context("Numeric");

Context()->variables->add(t=>"Real");        # if you want a variable other than x

Context()->flags->set(reduceConstants=>0);   # don't make 1/3 into 0.3333333

###### Random parameters and correct answer(s)

$a = random(2, 10, 2);                       # random number from 2 to 10, with step 2: so, 2, 4, 6, 8, 10

$b = random(2, 11, 1);                       # random integer from 2 to 11

$ans1 = Compute(" -1/($a*t-1/$b-$a^2) ");    # correct answer

###### Text of the problem

Context()->texStrings;

BEGIN_TEXT

Use separation of variables to obtain the solution to the following initial value problem.

$PAR

\(y' = $a y^2 \) and \( y($a)= $b \)

$PAR

Answer: \(y(t) =\) \{ ans_rule(40) \}

END_TEXT

Context()->normalStrings;

###### Answer comparison

ANS($ans1->cmp);

ENDDOCUMENT();
Explanation:
- Scalar variable names are prefixes by dollar sign in Perl. Hence the use of \( \) delimiters for inline TeX formulas. Displayed formulas use \[ \].
- $PAR is for paragraph break. There is also $BR for line break.
- Perl will simply substitute variables like $a with their values in TeX formulas. Notice that $a is not allowed to be 1, to avoid the equation “y’ = 1 y^2”. Watch out for superscripts: x^{$a} is safer than x^$a as the latter will break when $a has multiple digits.
- To have multiple answer boxes, use \{ ans_rule(40) \} multiple times. The number here is the number of characters in the box. The answers are checked in their order of appearance by
ANS($ans1->cmp); ANS($ans2->cmp);and so on. - The syntax of
Compute(" -1/($a*t-1/$b-$a^2) ");is not TeX; it is closer to calculator notation. The formula, entered as a string, is parsed into a MathObject. There is some flexibility in this syntax: powers can be $a^2 or $a**2, exponentials exp(t) or e^t.
The presentation of correct answer (which students can see afterwards) also merits consideration. The flag reduceConstants=>0 is used above to avoid turning fractions into decimals in the correct answer. But on the other hand, it will leave $a^2 unevaluated, e.g., it will be 5^2. Here is a more careful approach, where instead of $ans1 = Compute(" -1/($a*t-1/$b-$a^2) "); we do some preliminary computations to get a nice form of the answer, without fractions.
$num = $b;

$A1 = $a**2 * $b;

$A2 = $a*$b;

$ans1 = Compute(" $num/($A1 - $A2*t) ");
These preliminary computations are done at Perl level, so the exponentiation has to be ** and division is best avoided unless the result is assured to be integer (otherwise an ugly float may appear in the correct answer).
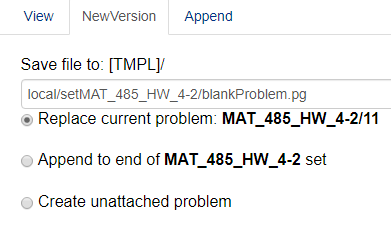
Once you are done, save the problem with NewVersion:
This time WeBWorK suggests the location following the sensible pattern /local/setName/ but you will want to change the filename to something other than blankProblem.
Subsequent changes, if needed, are made using Update, as when modifying OPL problems.